Mai-Tai Attributes
Some Mai-Tai variables, such as the name of a RenderMan shader to use,
can be associated with specific objects. Since these variables may be
different for each object in the scene they cannot be part of the Mai-Tai
globals. Instead, they are represented as additional Maya attributes.
It is up to the Mai-Tai user to add these attributes when the default
values are not acceptable.
Add To Selected
To add Mai-Tai attributes, first select one or more objects in Maya.
The selected objects may be geometric primitives or light sources.
Next, pull down the Mai-Tai menu and expand the "Add To Selected"
sub-menu:
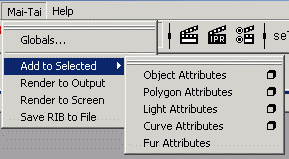
There are six different kinds of attributes. Each will be described
in turn below.
Object Attributes
These attributes may be added to any geometric primitive.

Environment Map
Checking this box causes Mai-Tai to automatically create a cube face
environment map and apply it to the selected object so that it will
appear reflective. Creating a cube face map involves six "pre-flight"
rendering passes from the point of view of the selected object.
Therefore, it should be used sparingly to minimize the total number of
renders. Primitives in proximity may share one environment map.
If the surface shader is left blank, objects with the Environment Map
box checked will default to the RenderMan "shinymetal" surface.
Surface Shader
Enter the name of a RenderMan surface shader here and it will be applied
to all selected geometric primitives. This assumes that the user has
created the RenderMan shader offline, compiled it, and installed it on
the shader search path. If this field is left blank, Mai-Tai will select
"shinymetal" for objects with Environment Mapping turned on. Otherwise, it
will default to either the Blinn, Lambert, or Phong shader as determined by
the Maya shading group.
Surface Parameters
Parameters to the RenderMan surface shader may be passed here using the
RIB syntax for token-value pairs. Tokens must be within quotation marks
and should match the name of one of the parameters of the RenderMan shader.
Each token is followed by a value contained within square brackets. The
value should match the type and number of the parameter to the RenderMan
shader.
Displacement Shader
Just like the surface shader above, one may specify the name of a RenderMan
displacement shader here. The RenderMan shader must be created offline,
compiled, and installed it on the shader search path. The default is to
have no displacement.
Displacement Parameters
Pass parameters to the RenderMan displacement shader here using the
RIB syntax for token-value pairs.
Polygon Attributes
These attributes may be added to polygonal primitives, instead of or in
addition to the object attributes described above.
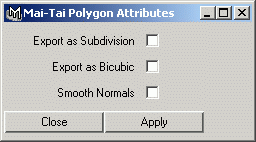
Export as Subdivision
Checking this box causes Mai-Tai to convert a Maya polygon mesh to a
RenderMan subdivision surface primitive. The "interpolateboundary" tag
will be set to prevent unattached edges in the polygon mesh from shrinking
inward. The resulting render will often appear smoother and less faceted
than rendering the polygon mesh directly.
Export as Bicubic
If the polygon mesh is a perfectly square grid of quadrilaterals, then
it may be rendered as a b-spline mesh. The results are undefined when
the mesh has any other topology. Unlike subdivision surfaces, the
boundary of the mesh will not be interpolated. The rendered geometry
will be smooth but smaller than the original by one row of quads on
each side of the mesh.
Smooth Normals
Mai-Tai can automatically compute smooth normals within a polygon mesh.
The normal at a vertex will be the average of the surface normals of
all facets that share the vertex. All adjacent facets will then share
that normal vector as well. This approach is sometimes called Phong
shading. Unshared vertices such as at the corner of a mesh will simply
have the surface normal of the only adjacent facet.
Light Attributes
These attributes may be only be added to light objects.
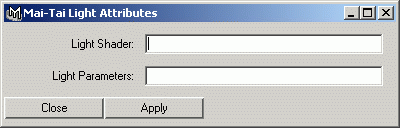
Light Shader
Enter the name of a RenderMan light shader here and it will be applied
to the selected light object. This assumes that the user has
created the RenderMan shader offline, compiled it, and installed it on
the shader search path.
Light Parameters
Parameters to the RenderMan light shader may be passed here using the
RIB syntax for token-value pairs. Tokens must be within quotation marks
and should match the name of one of the parameters of the RenderMan shader.
Each token is followed by a value contained within square brackets. The
value should match the type and number of the parameter to the RenderMan
shader.
Curve Attributes
Attach these attributes to curves, instead of or in addition to the object
attributes above.
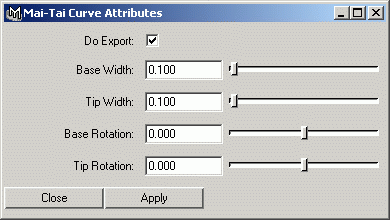
Do Export
Because curves in Maya are general for reference or animation, the default
is to not export them to RenderMan for visible rendering. Add curve
attributes and check the "Do Export" box in order to make curves visible.
Base and Tip Width
These specify the width in object space of the curve. The beginning of
each curve is considered the base and the last part is called the tip.
A curve can be made to taper by specifying a tip width narrower than the
base width.
Base and Tip Rotation
By default, Mai-Tai will export curves so that the normal remains facing
the camera at all times. This gives the curve a more constant looking
width and is ideal for modeling tubes or hair. To make a curve twist
like a ribbon, offset the base and/or tip rotation. The units are in
signed degrees. For example, if the base rotation is -360 and the tip
rotation is +360, the curve will twist two full times along its length.
Fur Attributes
Use these attributes to add fur to parametric primtives such as NURBS.
To edit the attributes, select the object and open the Maya attribute
editor. The fur attributes will be in the section labelled "Mai-Tai
Fur Rendering:"
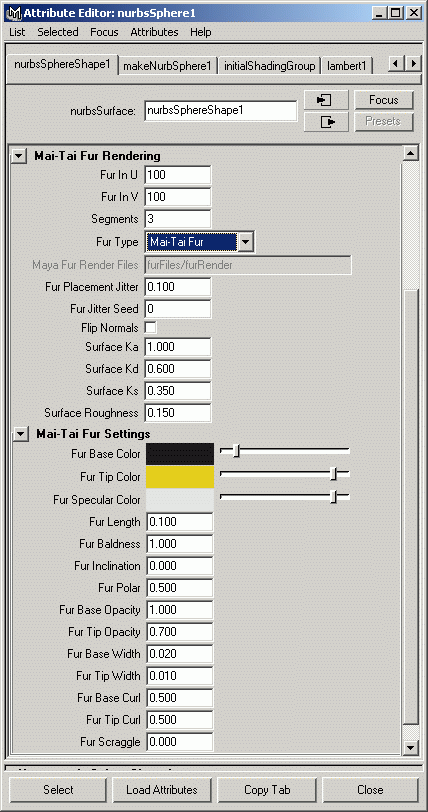
Mai-Tai Fur
Set Fur Type to "Mai-Tai Fur" and Mai-Tai will create the individual
curves for the fur itself. Control the statistical characteristics of
the fur under "Mai-Tai Fur Settings". The three colors will be passed
to the RenderMan surface shader called "hair" that is provided with
Mai-Tai.
Maya Fur
The other option is to let Maya create the curves that make up the hair
and export it to Mai-Tai through temporary files. Set Fur Type to
"Maya Fur Render" and select the name of the directory to hold the temporary
files. There's an extra step when using Maya Fur: manually exporting the
fur files. Go into Maya's Rendering module, pull down the Fur menu and
select "Advanced Fur Rendering":
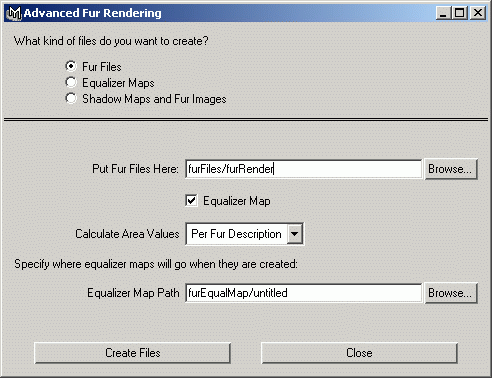
Check the "Fur Files" radio button and under "Put Fur File Here" enter the
same directory name as in Mai-Tai Fur Rendering. If these directory names
do not match, then the fur description will not be communicated from Maya
to Mai-Tai.
Copyright © 1999-2003 Dot C Software, Inc. All rights
reserved.
Dot C Software, Inc., 182 Kuuhale St., Kailua, HI
96734
(808) 262-6715 (voice) (808) 261-2039 (fax)
The RenderMan® Interface Procedure and RIB Protocol
are:
Copyright © 1988, 1989, Pixar. All rights
reserved.
RenderMan® is a registered trademark of Pixar.